You are using an out of date browser. It may not display this or other websites correctly.
You should upgrade or use an alternative browser.
You should upgrade or use an alternative browser.
on board air
- Thread starter shotgun
- Start date
abe
New member
shotgun
New member
it is a york compresser and it looks like it will fit next to the alternator 90 yj 2.5 ive heard rumors that it can be converted i just want to know how its also pulley driven, do i need a storage tank? blow off valve? air dryer? i dunno i would like some help with this if its at all possible
Bounty__Hunter
Super Moderator
Bounty__Hunter
Super Moderator
::Kilby Enterprises:: .So basicaly this would be a set up for a york compresser? And kilby do they have a web site?
I'm skeptical of the oil return setup as you're introducing a LOT of moisture into the crankcase of the york compressor.
bobcat481
New member
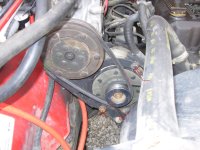
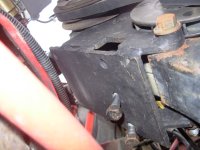
Kilby has NOTHING for the 2.5. I had to fab my own bracket. Here's a few pics. It basically attaches solid to the alternator mounts(red arrows), but with a "hinge" or "pivot" (green arrow)to take up the slack. The compressor mounts to a plate, the plate is attached to the bracket via the hinge. Two studs come up through the bottom of the soild bracket (nut welded on inside) and are used to put tension on the hinged plate thus tightening the belt. The double "bling" pulley is from Jegs. One word of advice, put a good sturdy hinge on it. I had to set the compressor/plate in place for the pics. My hinge broke and is due to be fixed in the spring. I worried about it when putting it together, and to no surprise it was the weak point. Other than that it functions great.


Here are the two studs going into the bottom. There is a square nut welded on the inside of the bracket. Weld nuts onto the studs, and tensioning is easy with a ratchet from the bottom. Inside the brackets jam nuts lock the studs down.

This is my "manifold". It's simple 3/8" steel fittings, with the things mentioned above. I don't run an oil separator, but do have one set up on air chuck disconnects for an in-line fix when air up tires. Everything else can get a little oil, don't bother me. I haven't had a whole lot of oil spewing out anyway, just don't want ANY in my tires. Good Luck! ~ Brad


Here are the two studs going into the bottom. There is a square nut welded on the inside of the bracket. Weld nuts onto the studs, and tensioning is easy with a ratchet from the bottom. Inside the brackets jam nuts lock the studs down.

This is my "manifold". It's simple 3/8" steel fittings, with the things mentioned above. I don't run an oil separator, but do have one set up on air chuck disconnects for an in-line fix when air up tires. Everything else can get a little oil, don't bother me. I haven't had a whole lot of oil spewing out anyway, just don't want ANY in my tires. Good Luck! ~ Brad
::Kilby Enterprises:: .
I'm skeptical of the oil return setup as you're introducing a LOT of moisture into the crankcase of the york compressor.
I wouldn't worry about the moinsture. My compressor sits on it's side so I get a lot of oil discharge, the line goes directly to the seperator. My problem is the plastic shraider (sp) valve on the bottom of the seperator, I can not get a good seal between the plastic and a metal fitting that I put on there, so when I flush the oil out of the seperator back into the york, it spits every where. I have tried thread sealer, thread paste, I am on the third filter in 6 years. the oil upon discharge does not appear to have moisture in it, well, at least it is not milky.
yo momma yj
New member
vintage bus guys who repower with BB V8s commonly use car AC compressors for their air brakes systems (air wipers ect). another slick bus trick for running modern hot engines on original radiators is use an intermittent wiper control to spritz the radiator fins with water and get the added evaporative cooling on big hills.
Bounty__Hunter
Super Moderator
I bet that added cooling puts on quite the steam show.
All compressors put out moisture when they compress air, the York isn't going to be any different. I guess how much moisture depends on where you live. Mine is a little milky indicating moisture.
All compressors put out moisture when they compress air, the York isn't going to be any different. I guess how much moisture depends on where you live. Mine is a little milky indicating moisture.

